Learn how to make soft and fluffy homemade white bread in a bread machine using six simple ingredients. This easy bread maker recipe is perfect for beginners and makes the best everyday all-purpose sandwich bread for toast, grilled cheese, and French toast without all the preservatives found in store-bought bread.

What You'll Learn:
- How to make a soft, fluffy loaf of homemade white bread in a bread machine using just six simple ingredients.
- Which bread machine settings, ingredients, and yeast produce the best results every time.
- Tips for choosing, using, and understanding both vintage and modern bread machines.
- Simple techniques to prevent common problems like overbaked bread, large paddle holes, and tough crusts.
Why I Love My Bread Machine
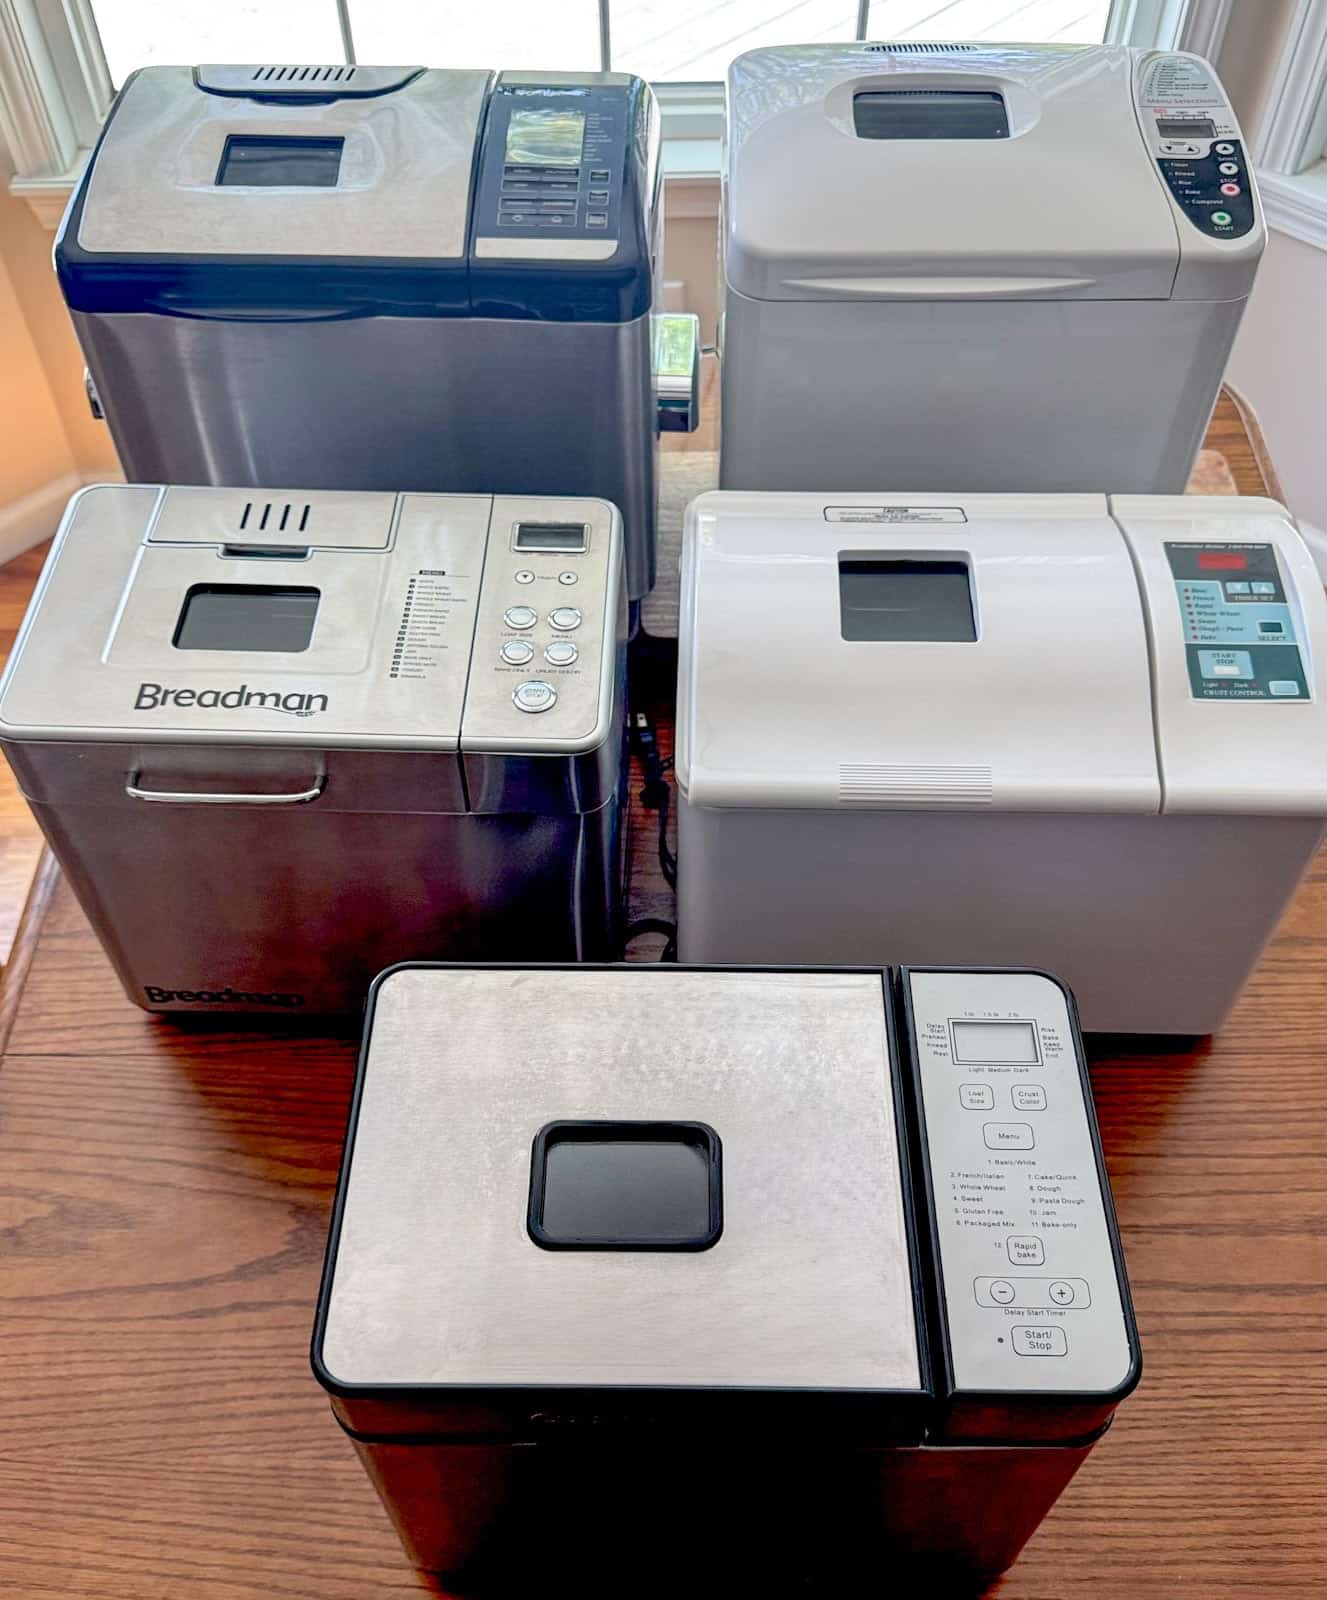
There is just something about a bread machine that makes me feel right at home in the kitchen. Out of all my appliances, it is hands down my favorite. I have five machines sitting in my kitchen right now, two Breadman models, two Kitchen Pros, and one Cuisinart. I have picked them up over the years for anywhere from five dollars to fifty dollars at thrift stores, garage sales, flea markets, and even on eBay.
Each one of these has something special about it. The Breadman (Middle-Left) has a paddle that folds down before the bake. I like that so I don't have to watch it so closely to remove the paddle before the Bake cycle begins.
Yes, there are days when I have more than one machine running at the same time. It might sound like a lot, but once you get used to fresh homemade bread, it becomes part of your routine.
If you are new to using a bread machine, it is one of the easiest ways to make homemade bread from scratch. You simply add your ingredients, choose your settings, press the button, and let the machine do the work. Mixing, kneading, rising, and baking all happen right in the pan.
That said, every machine has its own personality. Some of the newer models come with two paddles or even a built in light so you can watch your loaf bake. Older machines like mine are simpler, but they still make beautiful bread.
I always recommend finding your machine manual online if you do not have it. While some settings are universal, the timing can vary quite a bit from one machine to another. Learning your specific bread maker is one of the best things you can do for consistent results and the perfect bread.
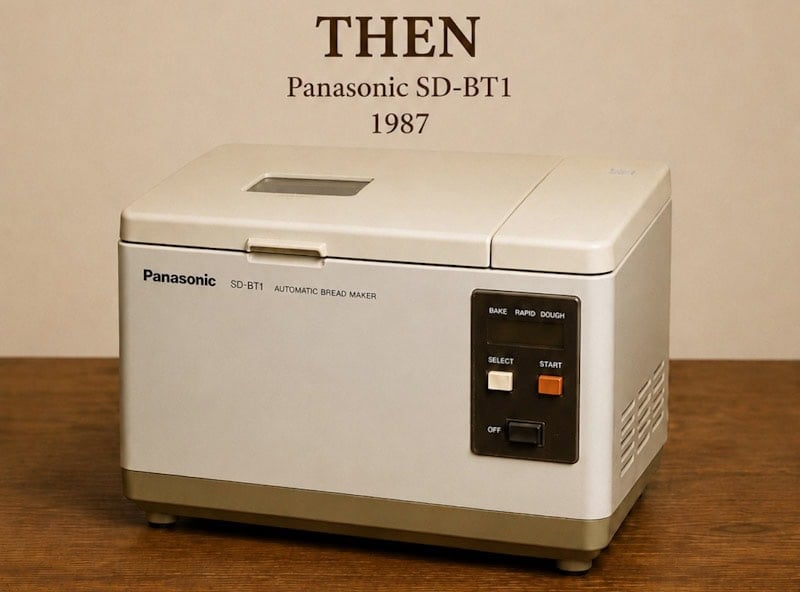
Then and Now: A Look at Bread Machine Baking History
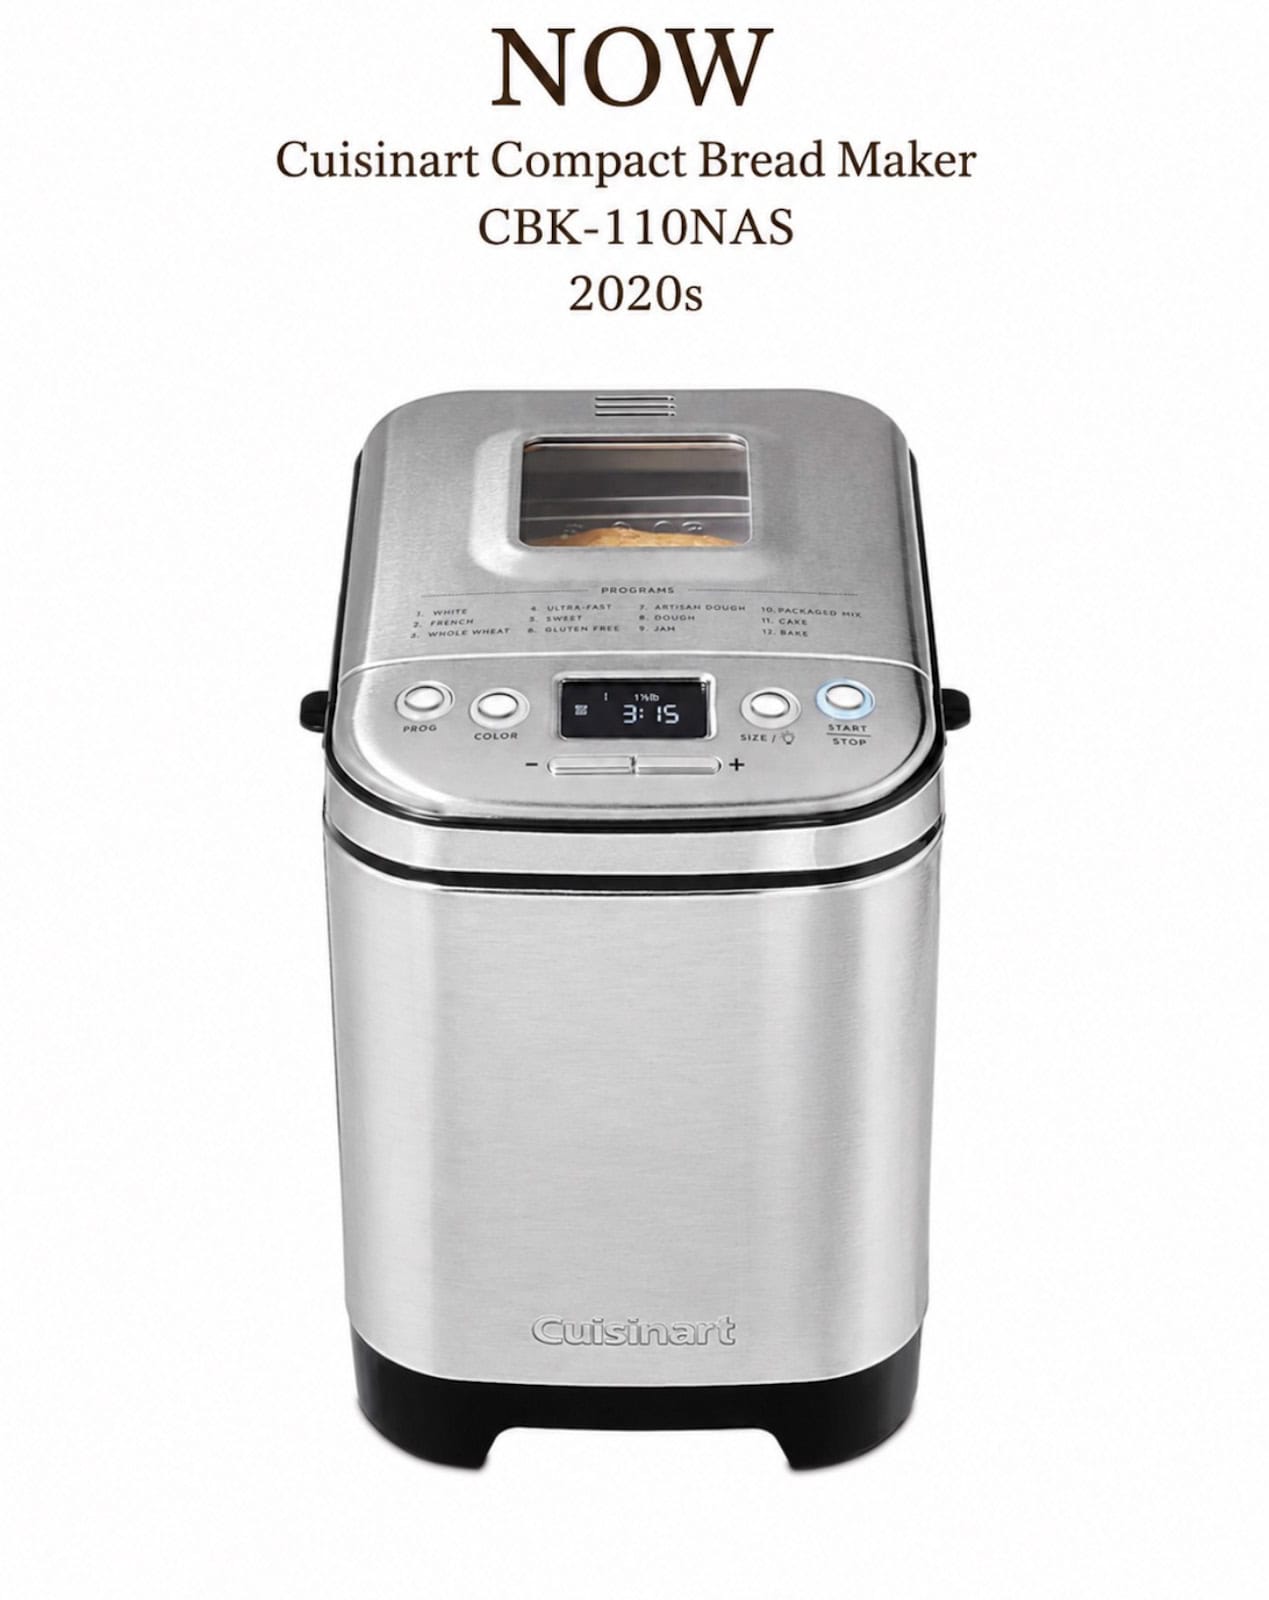
Some of the newer machines like this Cuisinart have a vertical style for conserving kitchen space when storage of appliances is an issue. Only, the loaf is more vertically shaped and you slice it sideways.
Bread machines became very popular in the early 1990s when home cooks were looking for easier ways to make homemade bread. These machines made it possible to enjoy fresh bread without spending hours kneading and watching dough.
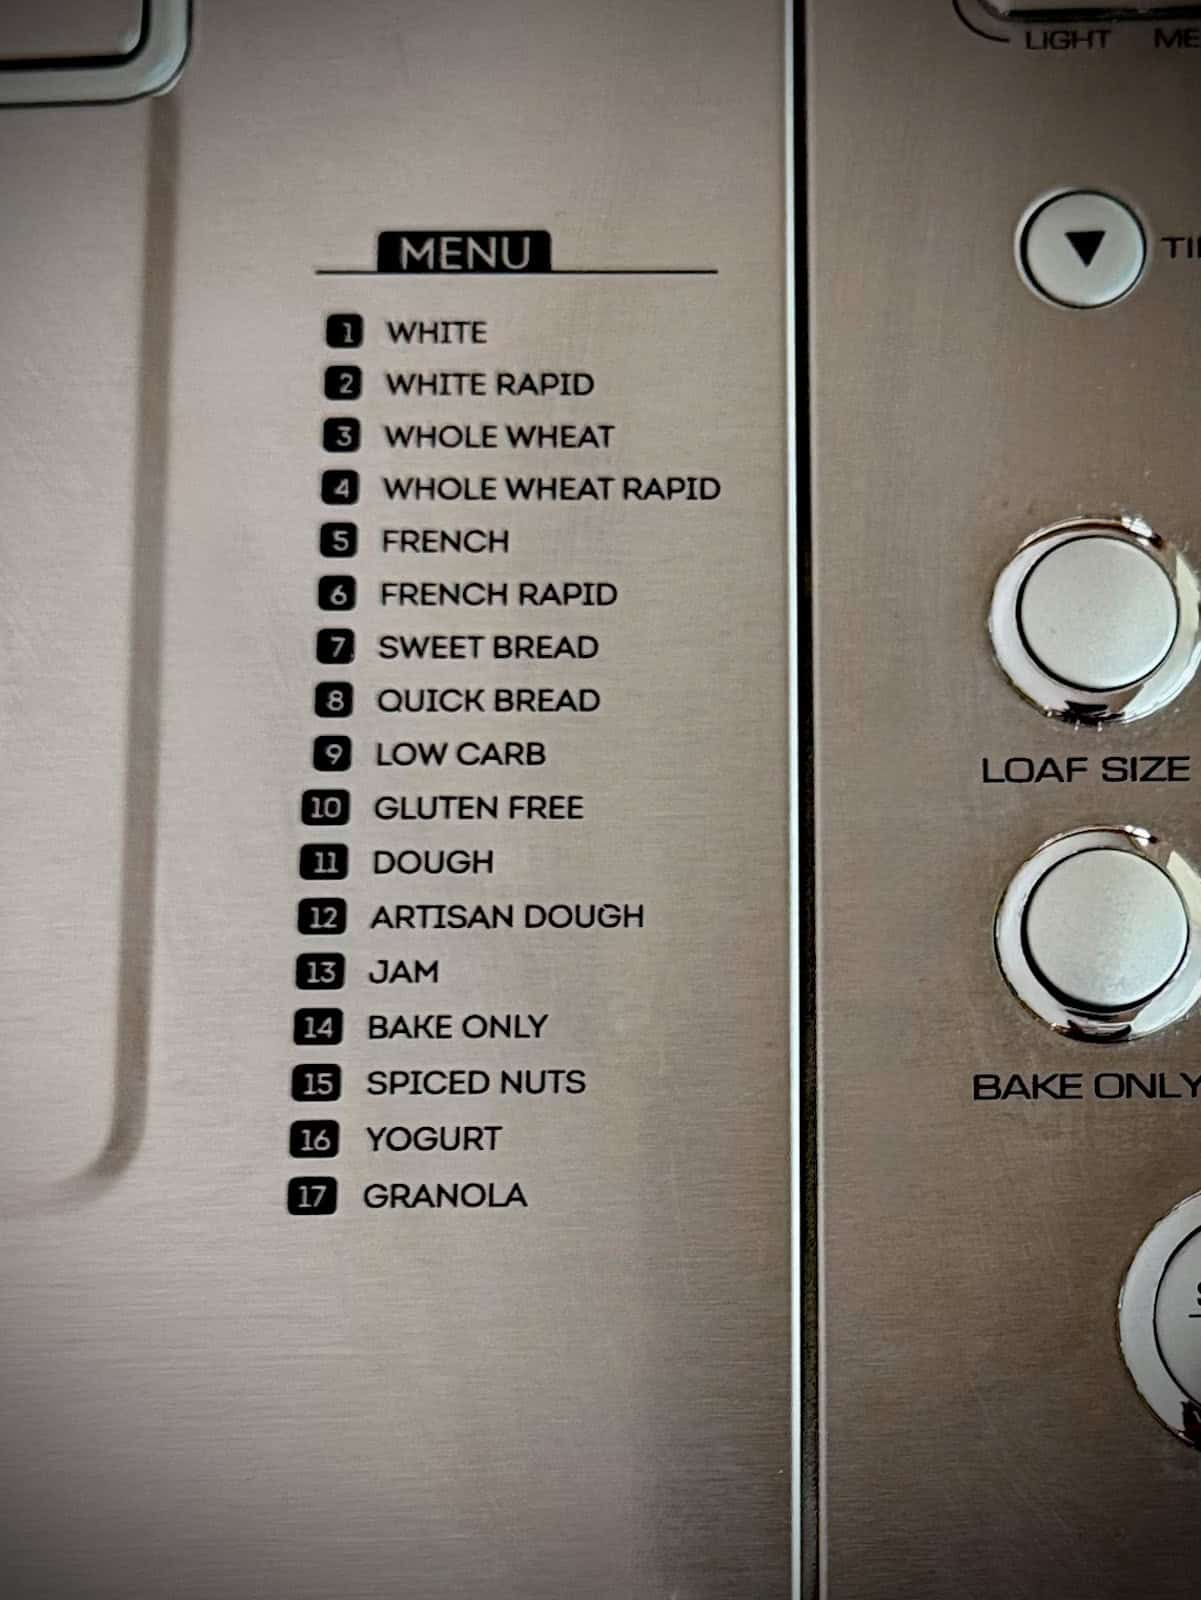
Back then, most machines were very simple. One paddle, a few basic settings, and not much else. They were reliable and easy to use, which is why so many people still love them today. Some of the first bread machines offered cycles for only yeast breads and bake time. As they became more detailed, settings such as Quick Breads, Jam, and even a Granola setting showed up on the panel.
Modern bread machines have added features like dual paddles, delay timers, and built in lights. Some even allow you to customize every part of the baking process.
Even with all those updates, I still reach for my older machines. They may not have all the extra bells and whistles, but they produce consistent results.
The biggest difference is that you learn to pay attention. You listen for cycle changes, watch the dough, and adjust the times as needed.
Your First Bread Machine
Every bread machine I own was bought secondhand, and honestly, I think that’s the perfect way to start. Bread machines are one of those appliances people often buy with good intentions, use a few times, then donate. That makes thrift stores, garage sales, flea markets, and eBay great places to find quality machines for very little money.
I originally started using bread machines just for kneading and proofing dough, especially for cinnamon rolls and pizza dough. In my opinion, YEAST BREADS are the best use for them. You get the convenience of mixing, kneading, and rising without having to bake the bread inside the machine. On the later models, they began adding other features to the panel to make Quick Breads like Banana Bread in the Bread Machine, or even Jams! <(haven't tried that setting!)
One of my favorite finds was a Kitchen Pro machine I spotted at a thrift store, brand new in the box for only $12.99. Later, I found a Cuisinart bread machine, also new in the box, for under $15. If you’re not ready to spend a lot of money on a new machine, secondhand is a smart place to start, especially if you are not sure yet if this is something you are really into.
Just a note, I have almost every cooking appliance known to man and the bread machine is in my top three favorites to own.
If you do buy a used one, just make sure it has the paddle inside.
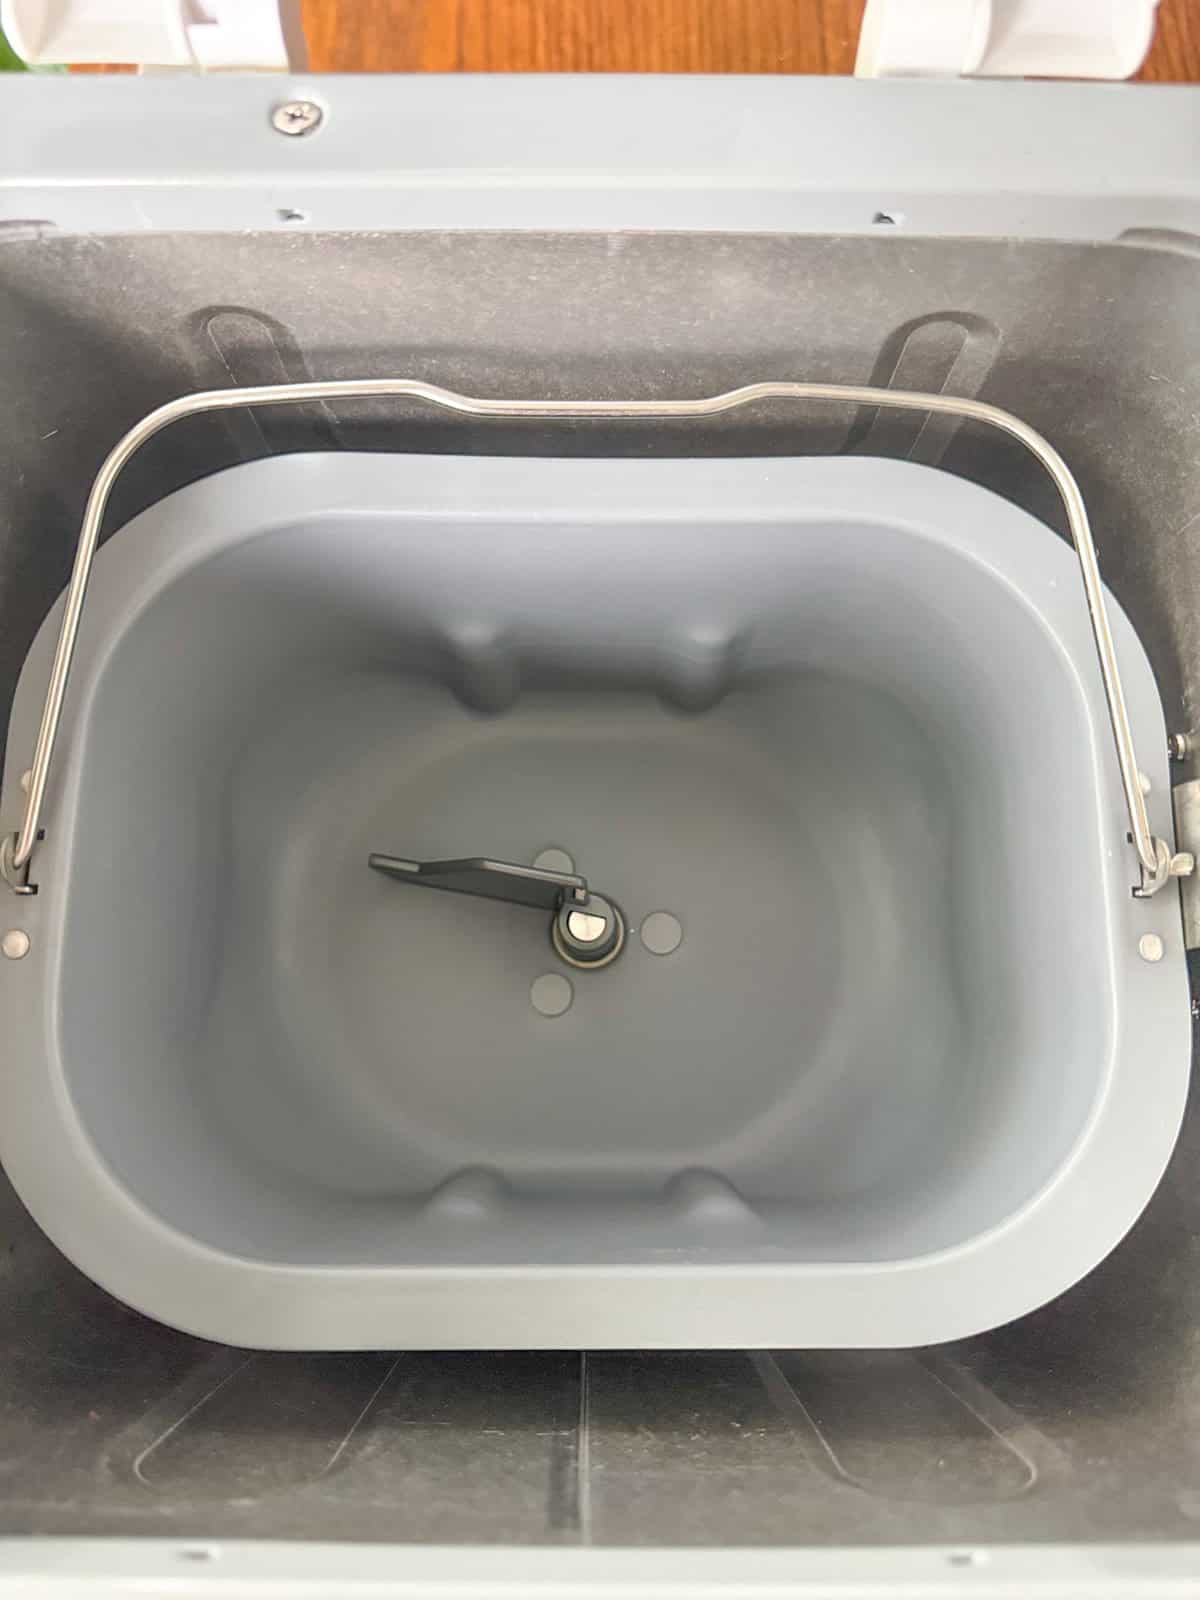
Understanding Your Bread Machine Paddle
Before you start baking, take a quick look inside your bread pan and make sure the paddle is in place. This small piece is what kneads the dough, and without it, your bread simply will not come together properly.
If your machine is missing the paddle, do not worry. You can easily find replacements online, and it is well worth picking one up.
One thing I have learned over the years is how much that paddle affects the finished loaf. If you leave it in during baking, you will end up with a larger hole in the bottom of your bread. Some people do not mind this at all, especially if you are slicing for toast or sandwiches.
If you want a cleaner bottom slice, you can remove the paddle right before the final rise cycle. This does take a little practice, especially since most older machines do not alert you when the final rise begins.
You can absolutely leave the paddle in and still get a beautiful loaf. It really comes down to personal preference.
Bread Machine Yeast = Instant Yeast
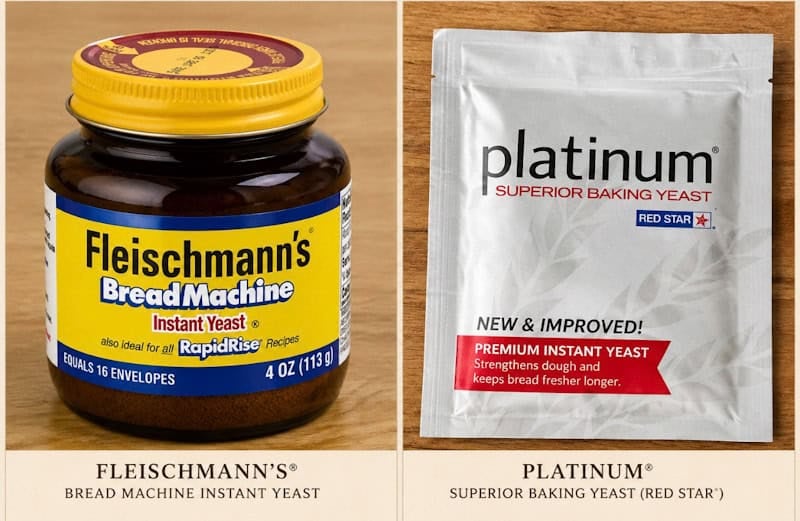
Bread machine yeast is actually very similar to instant yeast, and in most cases, they are the same thing. Years ago, some brands marketed “bread machine yeast” as a special product, but it was really just instant yeast with a finer texture to help it dissolve and activate a little faster in the dough.
The main reason it was labeled that way was to make it feel more tailored for bread machine users. Today, you can confidently use instant yeast in place of bread machine yeast with no changes to your recipe. Both are designed to be mixed right in with your dry ingredients and do not need to be proofed in liquid ingredients first, like active dry yeast.
If you are wondering what type of yeast to use for bread machine bread, instant yeast is the easiest and most reliable option. I regularly use Red Star Instant Yeast because they have sent me cool products and samples when I've won awards in the National Festival of Breads.
How to Use a Bread Machine Successfully
Using a bread machine is simple, but there are a few tips that will help you get the best results every time.
Start by adding your ingredients in the order recommended by your machine. Most older bread makers call for liquids first, followed by dry ingredients, with the yeast added last. This layering helps everything mix evenly. I put the yeast in last, on top of the flour so the yeast and salt do not touch each other.
Once everything is in the pan, choose your settings. For this white bread machine recipe, I use the basic bread cycle and set the crust color to light. On most machines this setting is called BASIC or WHITE. On one of my machines it says, "Basic/White."
Even with that setting, I still keep an eye on the baking time. One thing I have learned is that you cannot fully trust your machine when it comes to the baking cycle clock.
For example, when I make banana bread in the bread machine using the quick bread cycle, I stop the baking about 25 minutes early. If I let it go the full total time, the bread ends up over baked and scorched.
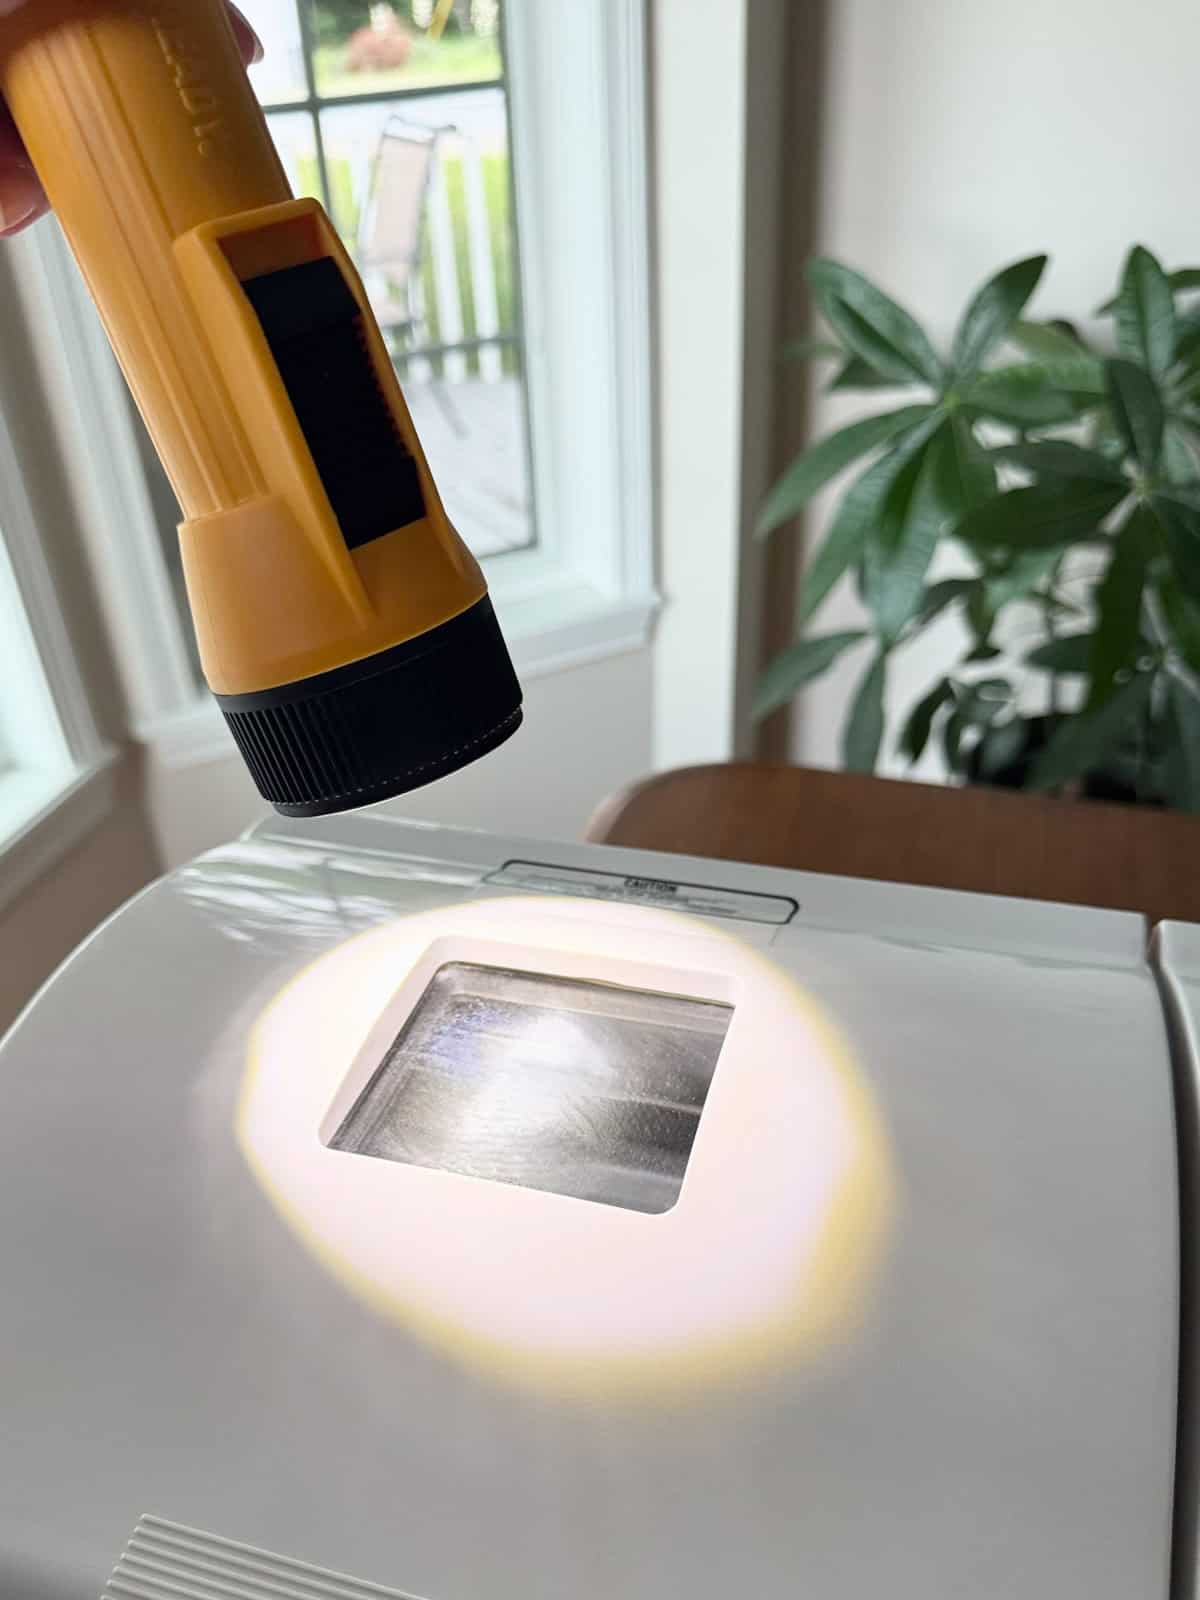
The same idea applies here. Toward the end of the baking cycle, keep an eye on your loaf. Try not to lift the lid, since that lets heat escape and can cause your bread to deflate.
Instead, I like to use a flashlight and peek through the little window on top. Some newer machines have a built in light, which makes this much easier.
Ingredients for Bread Machine White Bread
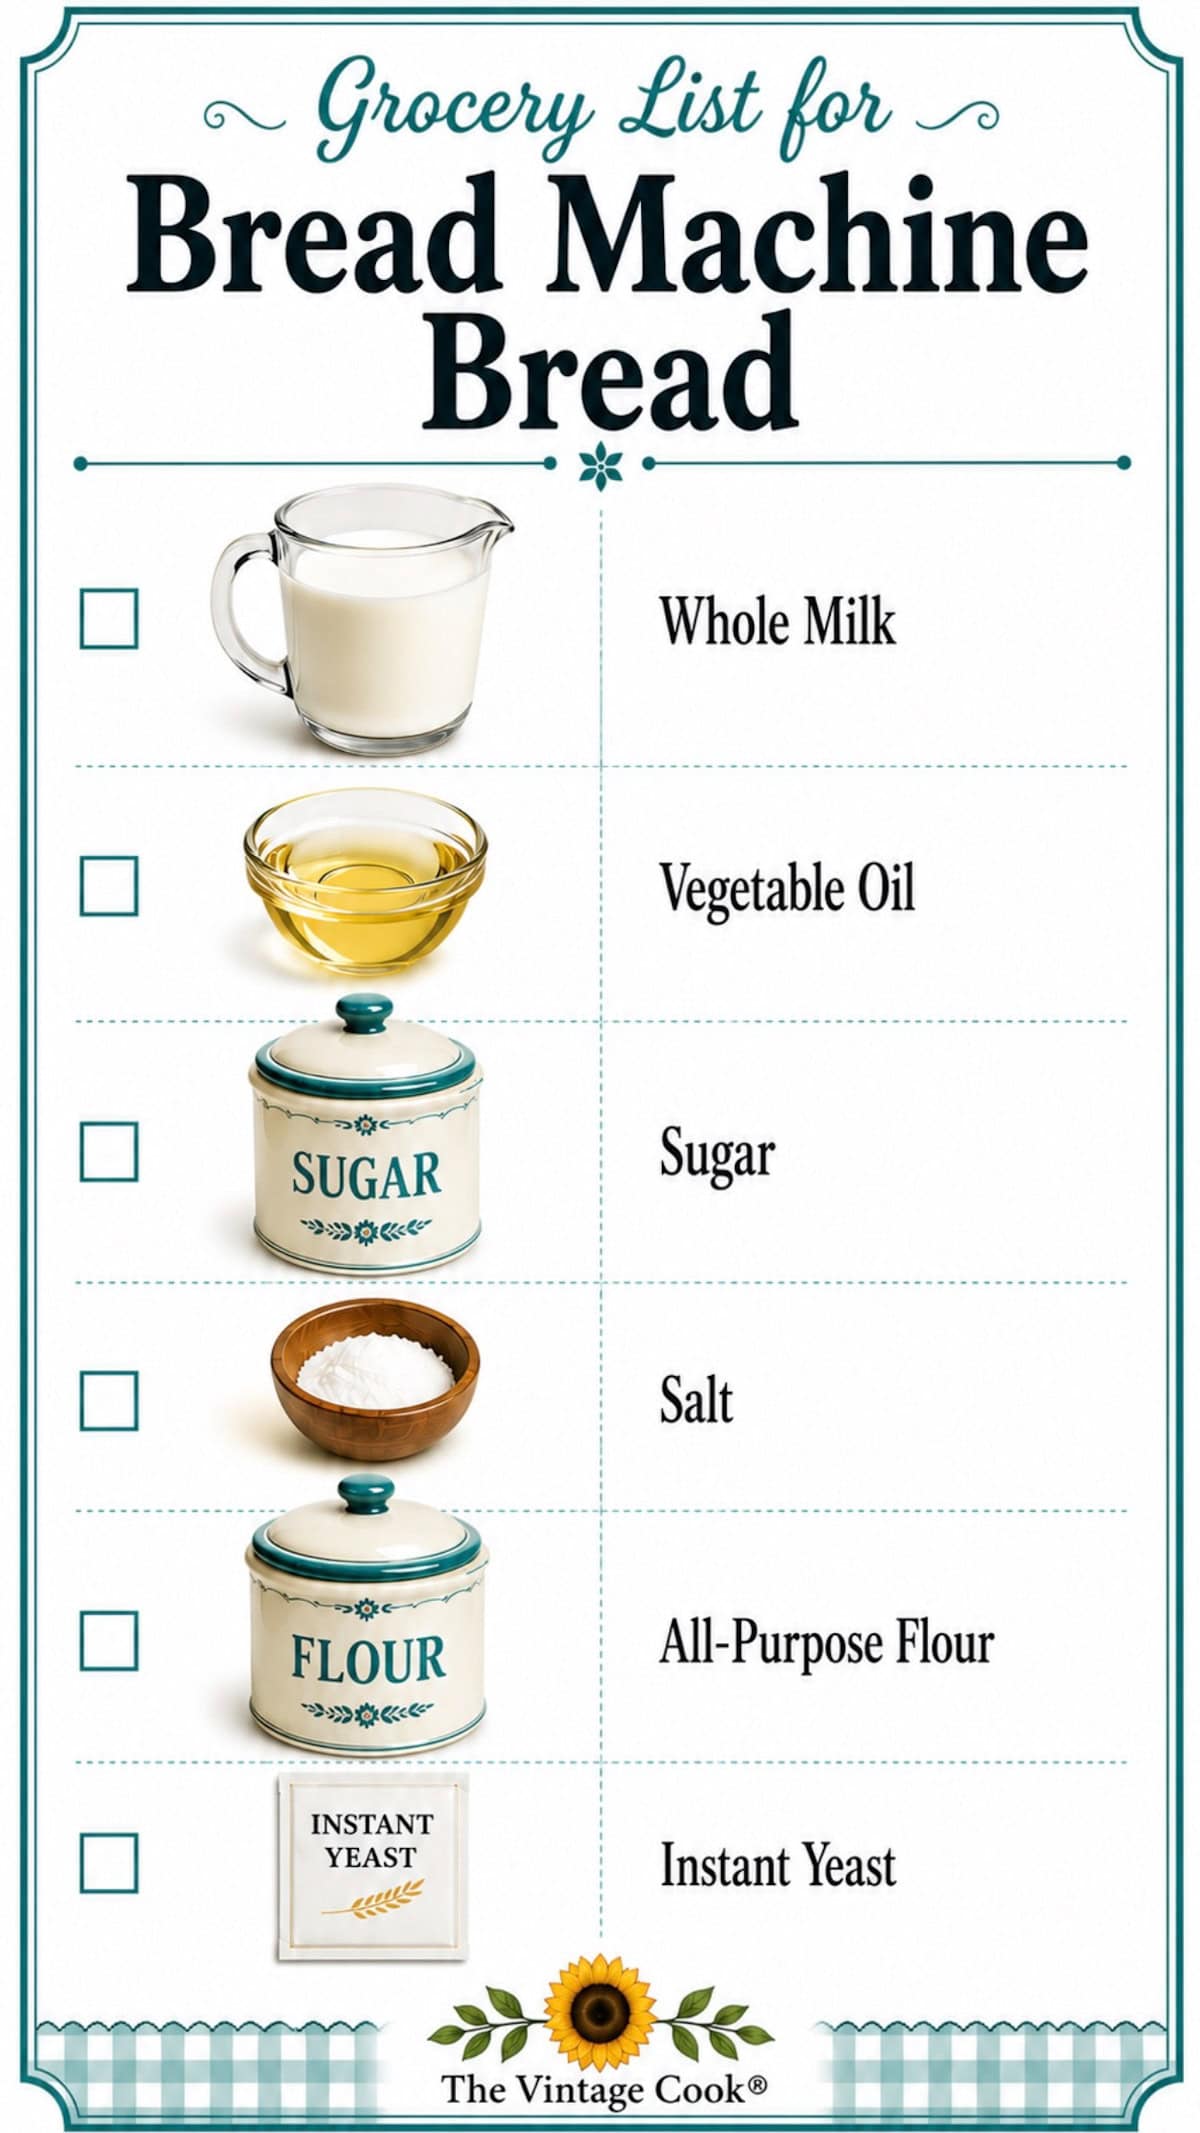
Whole Milk: Adds richness, a creaminess for a softer crumb and golden crust.
Vegetable Oil: Keeps the bread soft and moist, which is perfect for slicing. Make sure your oil is clear and fresh smelling (Not yellowed or pungent, it's surprising how fast oil can spoil) I prefer vegetable oil over butter because of the browning and overall weight but you can certainly replace the oil with melted butter.
Sugar: Adds a touch of sweetness and helps feed the yeast for a better rise.
Salt: Fine Sea Salt or Table Salt.
All-Purpose Flour: Creates a lighter texture than bread flour, making it ideal for classic white sandwich bread.
Packet Instant Yeast: This is what gives the bread its rise and light texture. Instant yeast works perfectly in bread machines. I like to use Red Star Platinum Instant Yeast.
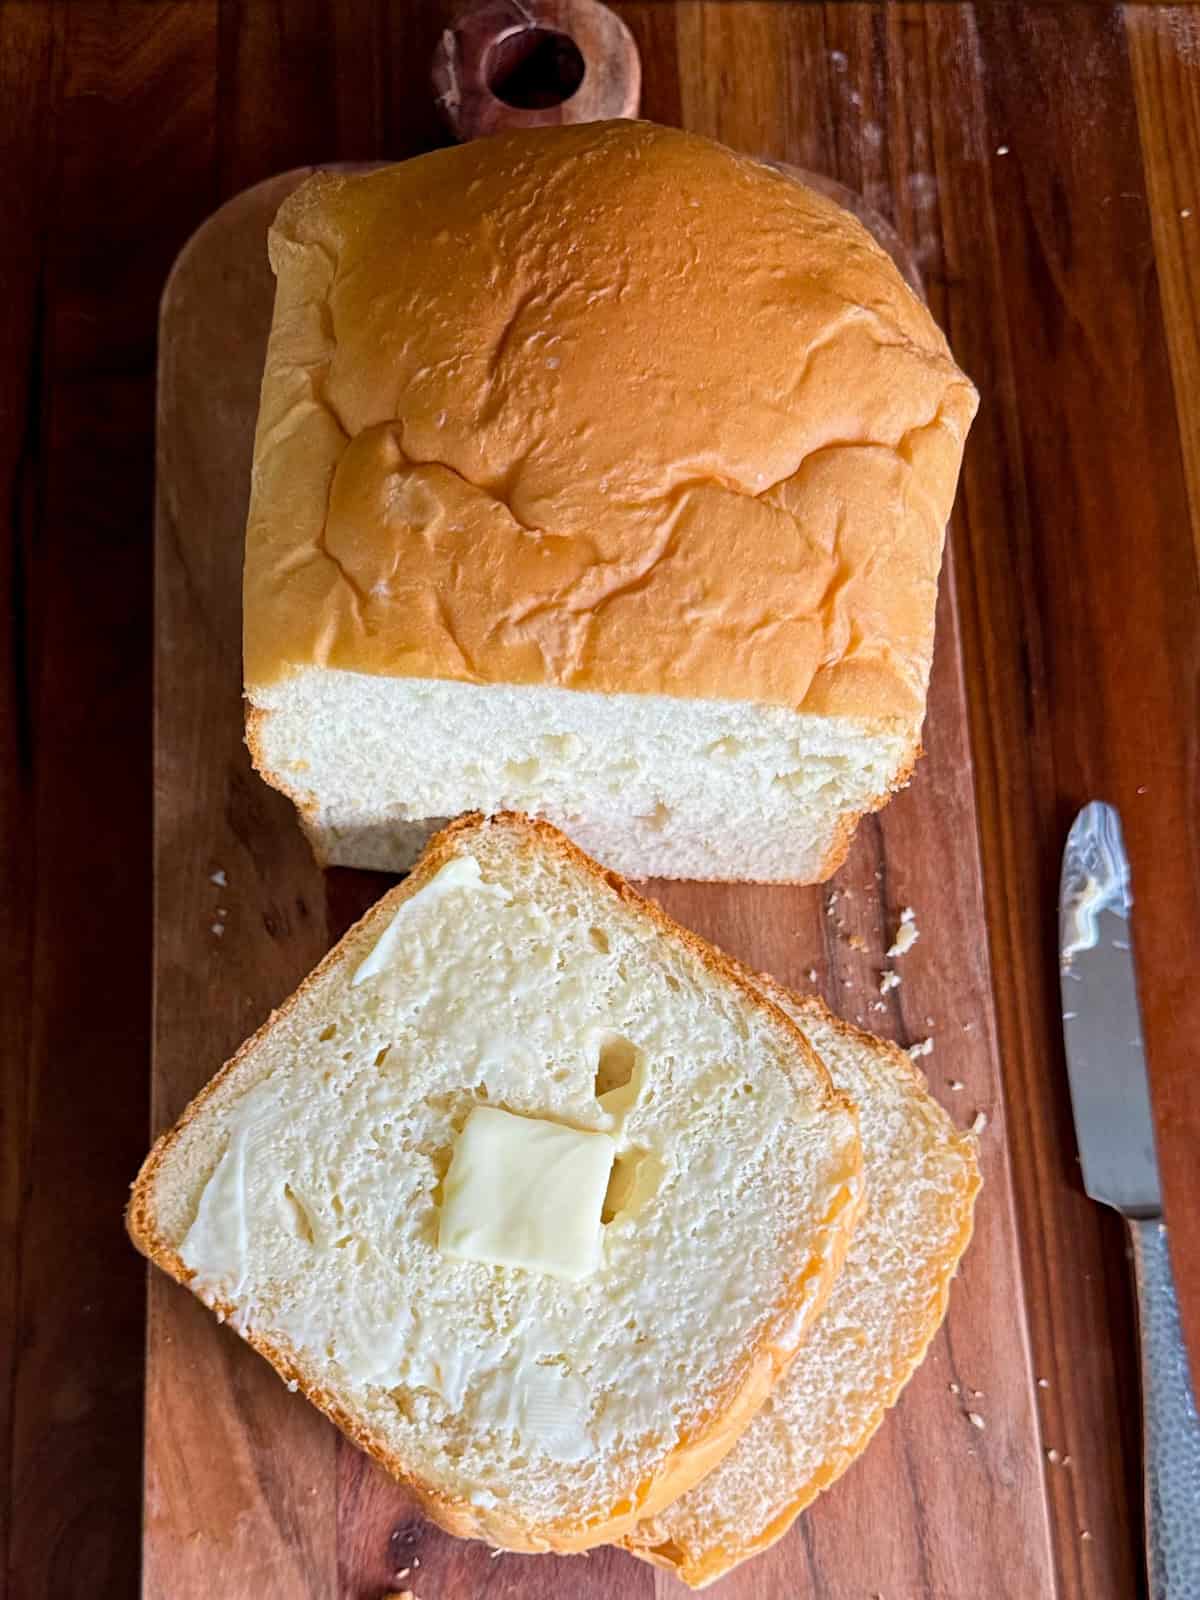
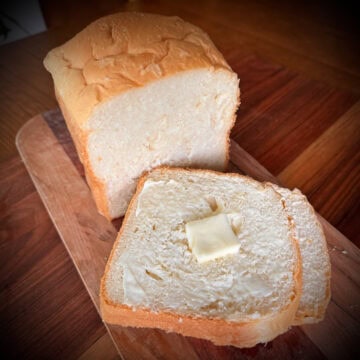
This recipe makes a large, fluffy loaf that rises beautifully and gives you those thick, spongy slices. If you would like to make a 1 pound loaf, simply cut all of the ingredients in half.
How To Make White Bread in the Bread Machine
Step 1
Make sure paddle is in place. Add ingredients to bread machine pan in the order listed.
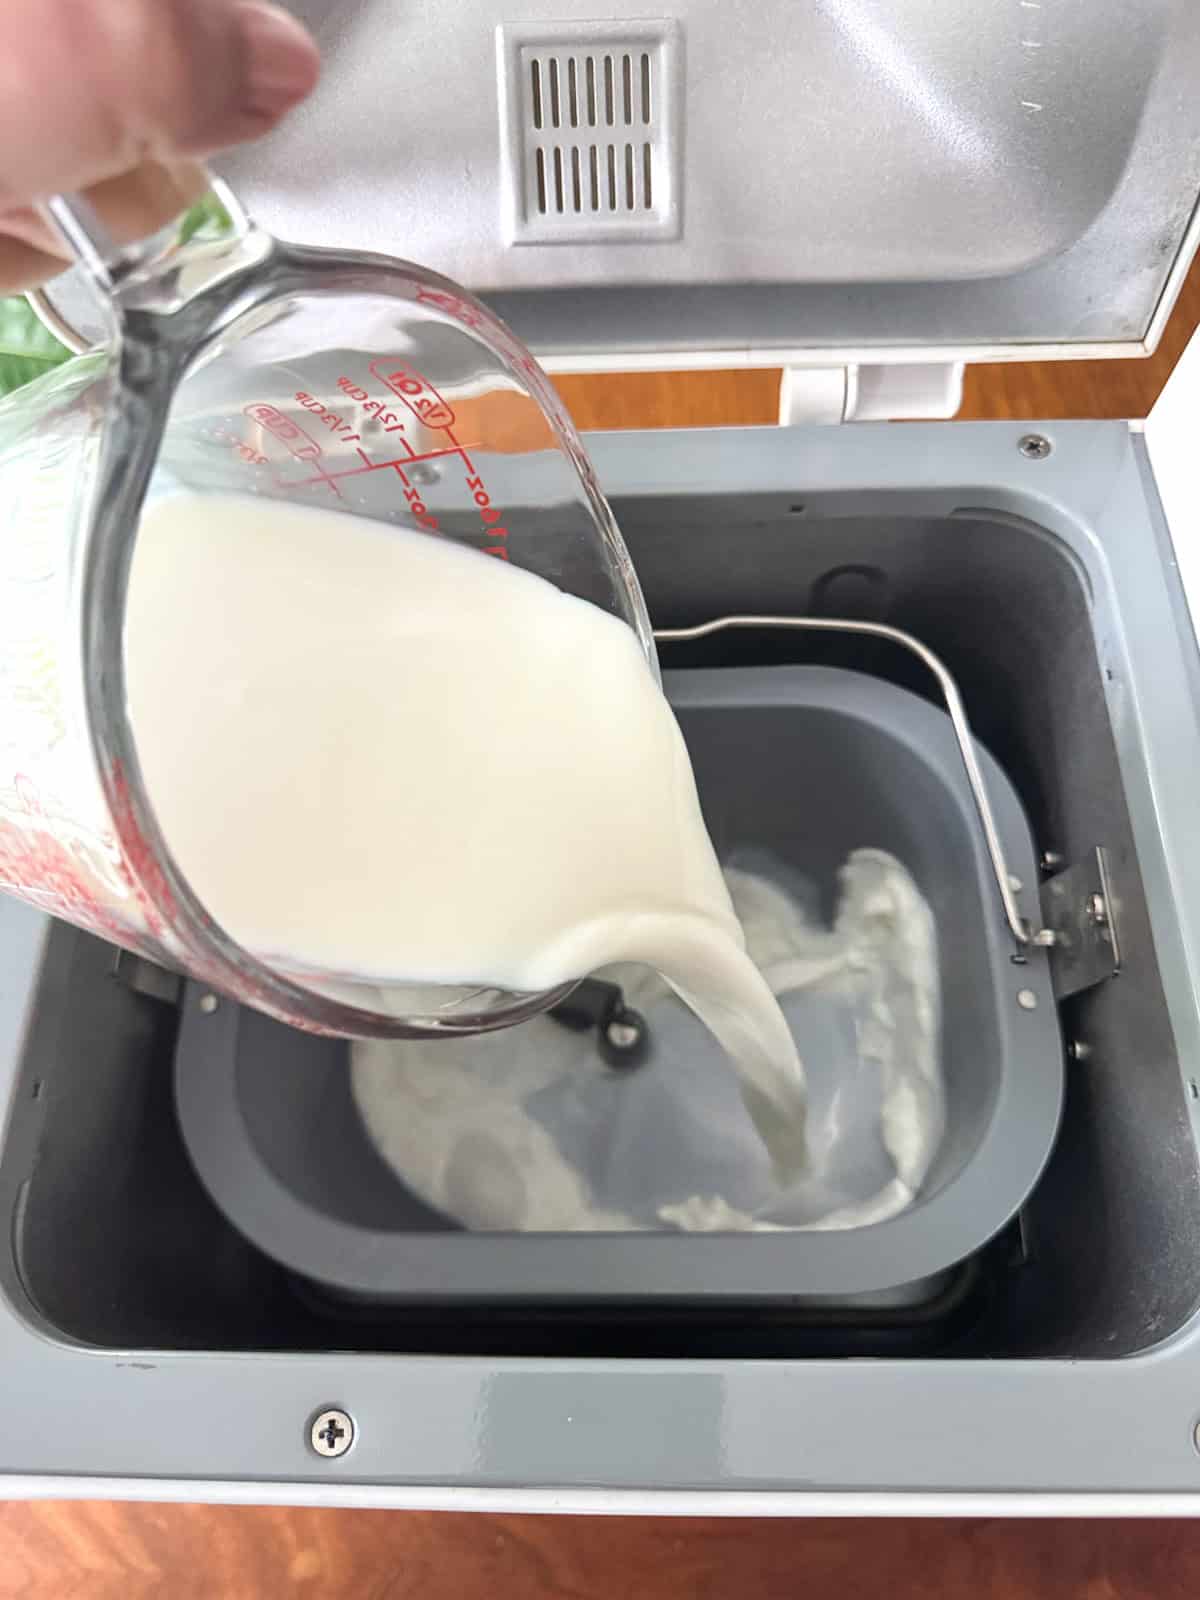
First, Milk. It doesn't need to be warmed.
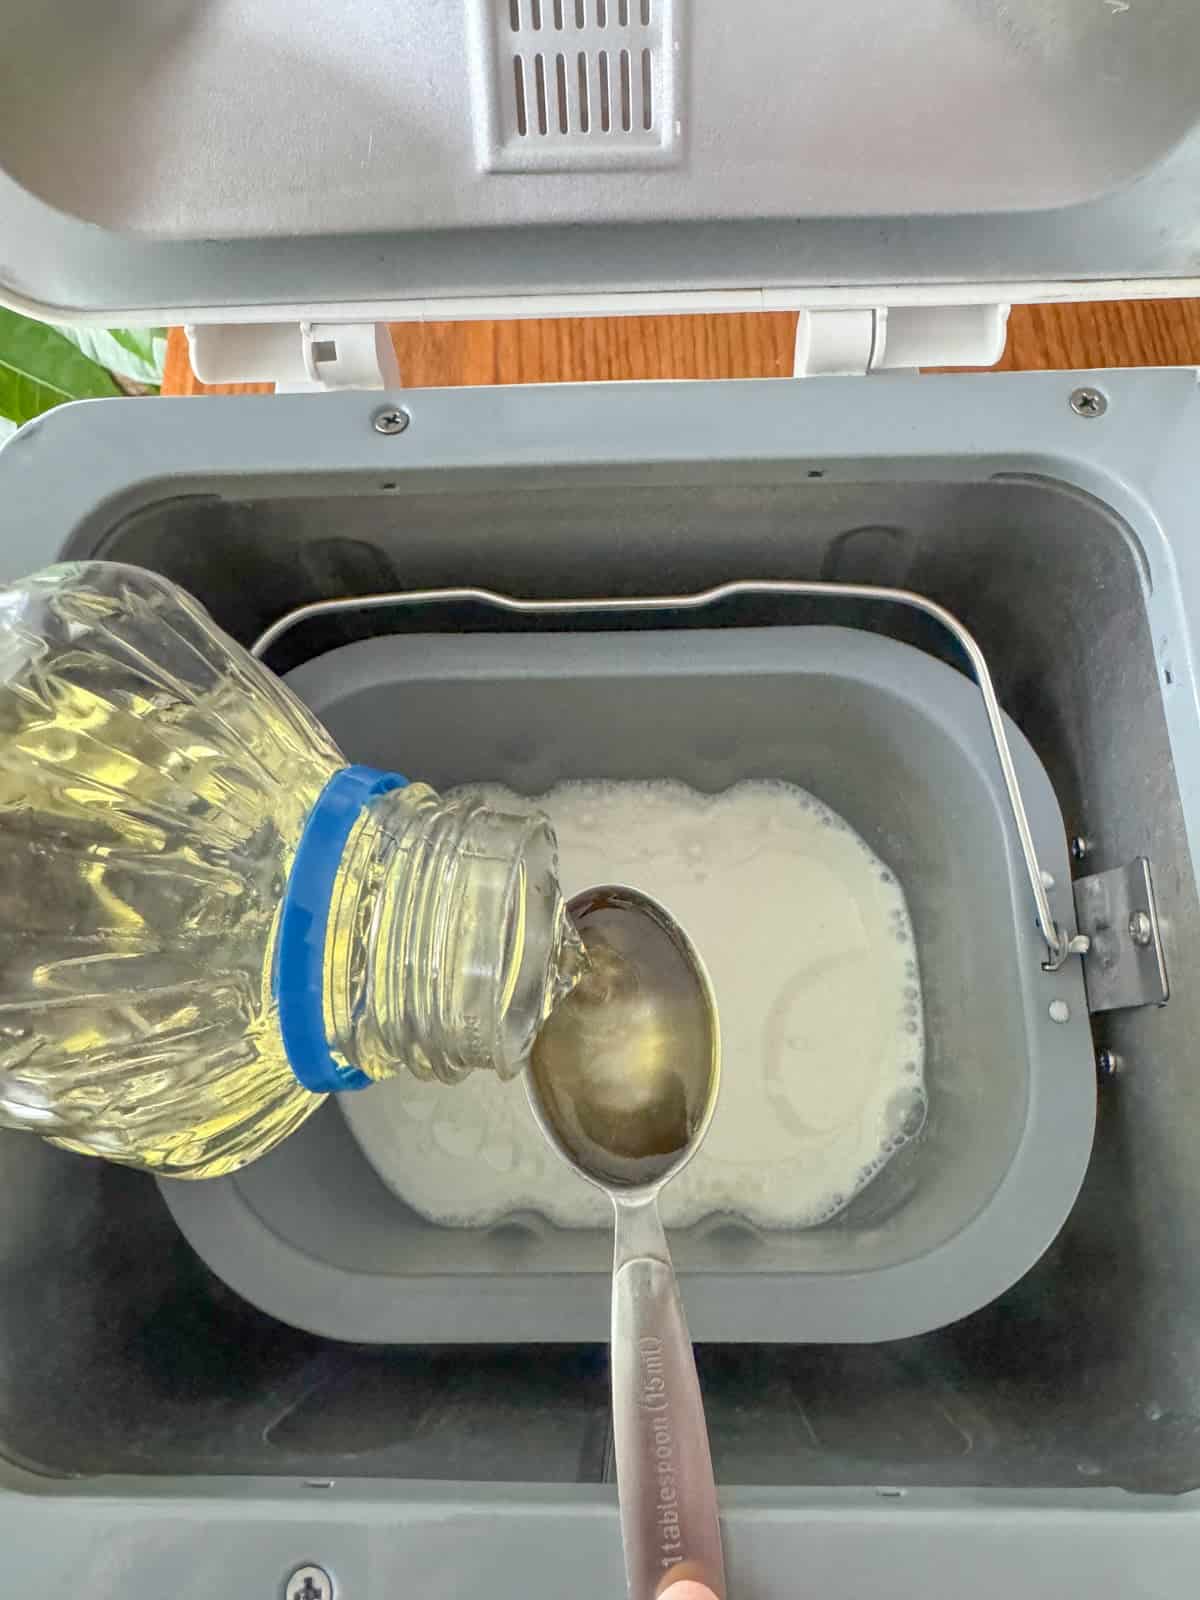
Then, add the vegetable oil.

Finally, add sugar, salt, flour and yeast.
Step 2
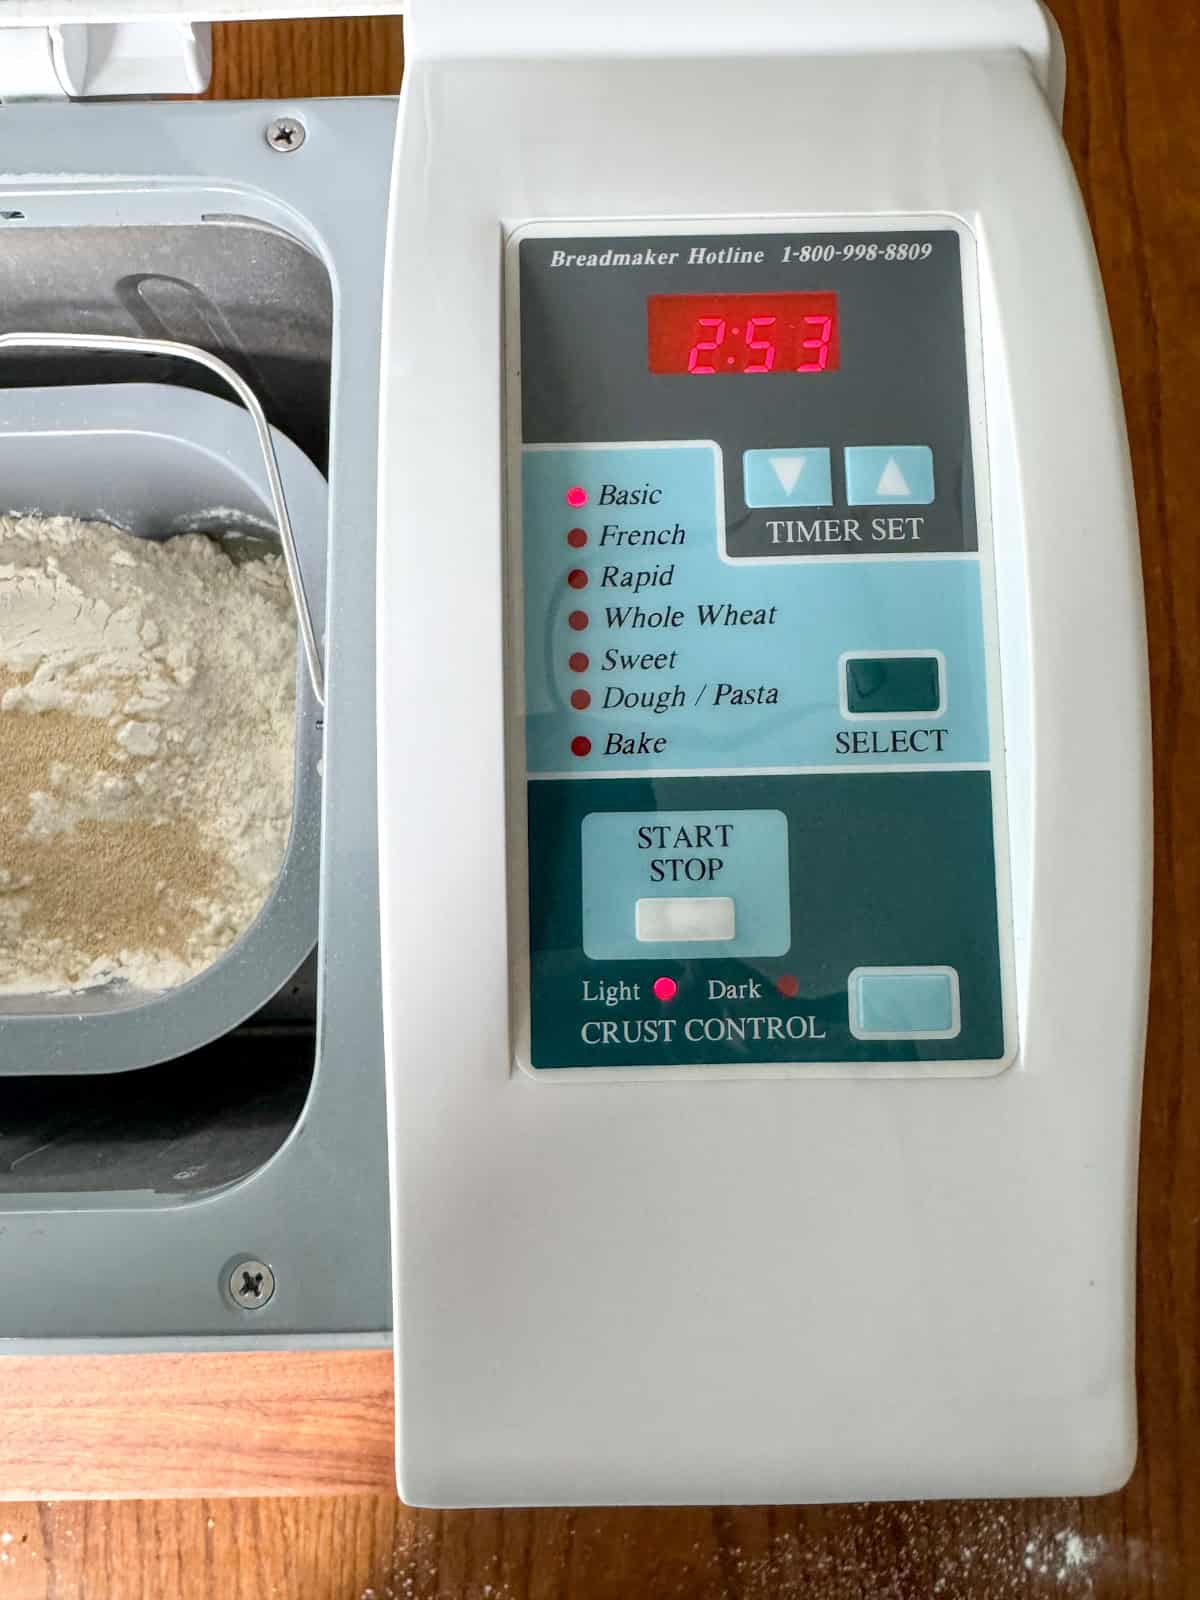
SELECT: MENU
SELECT: Basic or White
SELECT: Crust Color Light
SELECT: 2 lb.
Close lid and press START.
(Allow dough to knead, rise, and bake.) The dough may look tough or dry in the first 15 minutes but you need to let it do the work. Don't add more liquid. It takes time for the gluten to develop. You will know it's ready when the top is nicely golden.
Step 3
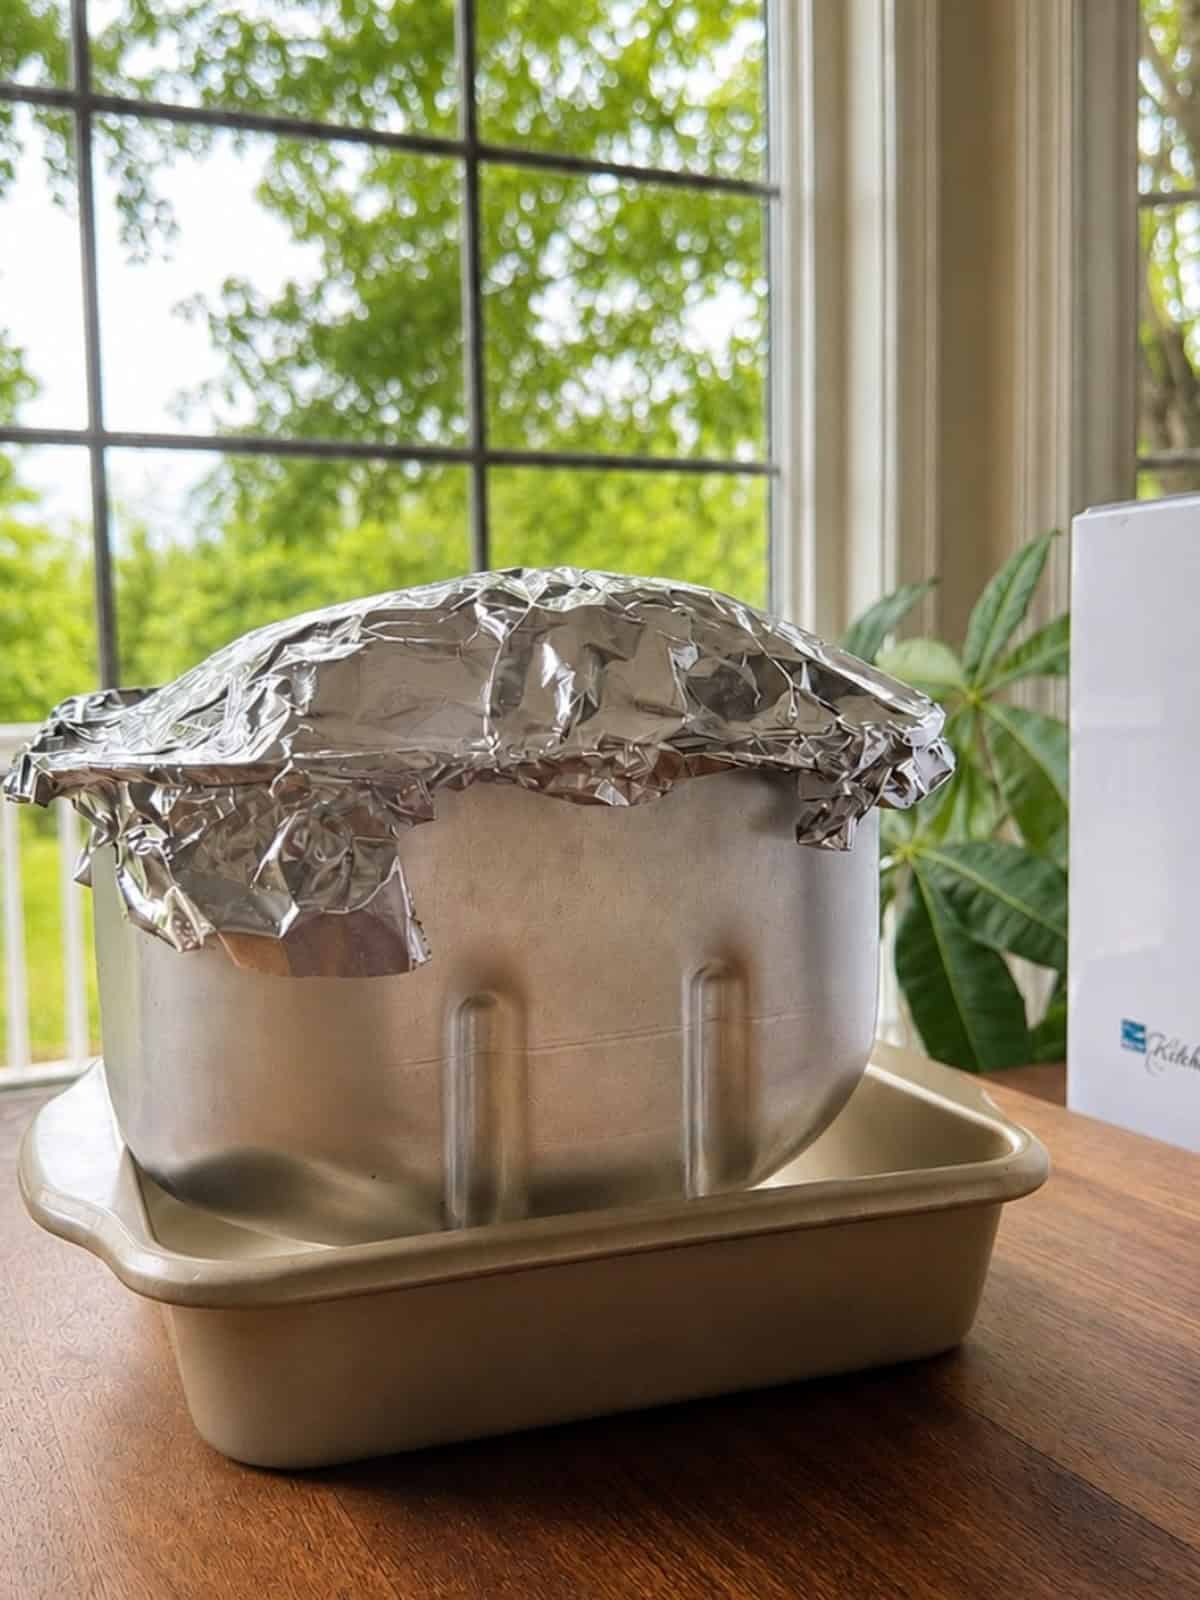
Remove bread pan from machine and cool.
Let cool for 25-30 minutes and then while still warm, cover with foil to lock in moisture. = Soft Bread.
Recipe Note
One of the most important steps happens right after your bread finishes baking. As soon as the cycle ends, carefully remove the loaf from the machine using oven mitts. Be careful because the pan of the bread machine is very hot.
Place the baking pan on a baking sheet on top of your stove. Wait 25 minutes, then cover it with foil. Since the pan is very hot, I use a towel to put the foil on and seal it over.
For a perfect bread texture, I like to gently seal the top to keep the steam inside. This keeps the crust soft instead of hard. This will add that slight wrinkle to the top. Another way to keep it soft on the top is to brush it with a bit of butter.
I do not let the bread cool inside of the machine. It continues baking in there and that overbakes it.
This bread is incredibly versatile. One of my favorite ways to use it is for French toast. The slices are so thick and fluffy that one piece is enough for a full breakfast.
It also makes a perfect grilled cheese sandwich with a soft inside and golden crisp edges.
Lanie's 🔅Recipe Reflections
Here are a few more helpful tips:
- Always set your crust to light and check early
- Avoid opening the lid while baking. I use a flashlight to peek through the window unless your machine has a light!
- Remove the paddle before the final rise if you prefer a smaller hole in the bottom
- Cover bread with foil before it cools to seal in moisture and prevent a tough crust on top.
- Let the bread cool completely before slicing for the best texture
Once you start making your own white bread in a bread machine, it is hard to go back to store bought. The texture and freshness are just so much better, especially when you pull out that perfect loaf with its soft crust and fluffy slices.
Common Questions
Can I Use Bread Flour Instead Of All Purpose Flour?
Yes, you can. Bread flour will give you a slightly firmer, heavier and chewier texture, while All-Purpose Flour keeps the loaf soft. I prefer to use All-Purpose for this basic white bread.
Can I use other types of yeast? Yes, if you only have Active Dry Yeast, go ahead and proof the yeast before you start. To do this, warm your milk up to the temperature of a baby's bath water. Pour the yeast in and stir. Let it rest for 20 minutes until bubbly. Start the recipe, ONLY this time, add the salt in last, after the flour. Remember we don't want the salt and flour to touch each other in the beginning.
Why Does My Bread Machine Bread Come Out Too Dark?
Try using the light crust setting and checking your bread early. Machines can run hot depending on the model. All of my bread makers bake too long for my taste.
You will have to spend time observing your machine to learn its timing. They are all slightly different.
Do I Have To Remove the Paddle Before Baking Cycle Begins?
No, it is optional. Leaving it in will just create a larger hole in the bottom of the loaf. For your first time making it, just leave it in and do not forget to pull it out before slicing. Wash it and secure it back with the machine for next time. *Many people accidentally lose it or throw it away and have to buy a replacement.
Warning: If you try to remove the paddle after the final rise, but before the bake starts, you will mess up your bread by disturbing the rise.
To Make a smaller loaf half-sized
This recipe makes a two pound loaf and fills the bread pan. It results in much larger slices than a store-bought loaf of bread.
To make a 1-pound loaf, simply cut all of the ingredients in half and use the same settings. The adjuster in the recipe card can do it for you as well.
Storing the Bread
Keep it wrapped at room temperature for a few days. You can also slice and freeze it for later use.

Extra! Extra! Read All About It! Join my free email list to receive the Newsletter and follow along on YouTube!
White Bread Machine Bread Recipe
Equipment
- 1 bread machine
Ingredients
- 1 ¼ cup whole milk
- 2 Tablespoons vegetable oil
- 2 Tablespoons sugar
- 1 teaspoon salt
- 3 cups All-Purpose Unbleached Flour
- 1 (¼ oz. package) Red Star Platinum Premium Instant Yeast
Instructions
- Be sure that bread spinner paddle is in place in bottom of bread machine pan.
- Add all ingredients in order listed from top to bottom. Milk, oil, sugar, salt, flour and yeast. (Be sure that the salt and the yeast do not come in contact. Sprinkle the yeast on top of the flour, last.)
- Turn the machine on. Select: MenuSelect: Basic or White Bread SettingSelect: Crust Color - LightSelect : Size - 2 lb.
- Press Start. Close Lid.
- Optional Removal of paddle: If you are going to remove the paddle, it should be done before the final rise. Otherwise, leave it in.
- Check bread 20 minutes before bake cycle is complete. When bread is finished, use pot holders to carefully remove pan from the machine and let cool on on metal pan or rack.
- After 25 minutes of cooling, cover the pan with foil to lock in some of the moisture. If you want a hard crust, then don't cover.
Notes


Jessica B. says
This is really easy and my bread turned out exactly like the picture. thank you for sharing the recipe and explaining it.
admin says
I'm glad you found it! 🙂
Umbria Costello says
Looks good.
Mary C. says
When measuring bread flour, does it matter whether it’s the scoop and sweep or spoon and sweep method as for baking cakes?
Lanie says
For bread machine recipes they are pretty flexible. It’s not as precise as European baking. I’d say bread machine recipes are kin to dump cakes. Ha ha. It doesn’t matter but you do have to get an eye for the doughs consistency after it is completely mixed in that first cycle , so if it’s too sticky you can sprinkle in a little more. It’s better to add less than more, upfront, so you can adjust. I have more bread machine recipes coming! Thanks for stopping by.